The construction/renovation has ground to a halt over the past two weeks. We are waiting on the Bradford White water heaters we want installed--still on order, apparently. The plumbers are not coming back in until the heaters arrive, and the rest of the framing depends on their plumbing in the radiators. So we wait.
But while we are waiting, I wanted to share with you the cost of a leaky toilet. Please see the graph from September 2011 below.
Water usage is measured in cubic feet:
1 cubic foot = 7.48 gallons
To simplify the numbers for billing, we use Hundred Cubic Feet (HCF):
100 cubic feet = 748 gallons
The cost per CF is a little less than $.10
But, as you can see, a little leak can add up quickly!
We decided to begin the blog as an historical record of our first home purchase in Glendale, NY. We intend to highlight our successes, and equally important, explain why we chose to "do" a particular thing, or why something did not work, and we tried again. All this while keeping energy efficiency and eco-friendly building/remodeling practices at the fore of our planning and execution.
Monday, October 3, 2011
Sunday, September 25, 2011
Roof Vents and Solar Fan Installed this Weekend
The weather has been spotty this week, with rain, rain, and more rain. We took a chance on Saturday, and decided we could install the vents and solar fan ourselves--we tried to get roofers out to look, but they were WAY too busy to even give this little job a second thought.
From start to finish, the job took about six hours. And two trips to HomeDepot prior to starting All up, the parts for the project cost around $1350, with the solar fan and roof curb eating up $1160 or so. Both the fan and the pop-vents have a lifetime warranty. And they were made in TX and upstate NY, respectively.
| Assembling the bathroom vent |
| Kitchen vent waiting to be assembled |
| Finally, everything up on the roof |
| The two passive vents were easy; I just needed to cut the roof membrane--the previous roofer cut the roof-deck but forgot to install them.... |
Second passive vent. I used
Loctite PL 10 fl. oz. Black Polyurethane Roof and Flashing Sealant in a caulk gun to seal the vents and curb to the roof. |
| Sunset at about 6:30p-kinda running out of time--roof curb will have to wait 'til tomorrow |
| Three down, one to go. The bathroom vent is ready to go in. The kitchen vent is on the right. |
| I had put a screw up through the underside of the roof to mark the center of the hole needed for the bathroom and kitchen vents. Then it was a matter of making a 6" hole with the reciprocating saw. |
| Day 2, Sunday 8am. Ready to install the roof-curb (top left). The solar fan is on its side and awaits its solar panel with adjusting bracket. |
| Cut hole for solar fan. Note the wire inside the hole. The house's cornice is attached, tied off, and supported with a dozen or so of these wires along the front. |
| Roof curb, installed. We went with the pre-fabricated one Attic Breeze sells. Super simple. |
| Adding the solar panel with adjustable bracket. |
| Applying a coat of Karnak #19 and then Karnak #34 Utility Grade Cotton Fabric |
| Finishing up the roof curb flashing. Solar fan installed, and functioning! |
| Finished front view. |
| Solar Fan. Worth a $300 tax credit this year... |
| Finished rear view. Polly is touching up some gaps under the parapet caps. |
Friday, September 23, 2011
Boiler installed; hot water heters delayed
We were forced to go with an atmospheric vent model as we were not able to create a satisfactory direct-vent option. This was also the case with the boiler--again, not a satisfactory direct-vent option. So, we sacrifice a little bit on efficiency with the atmospheric vs direct-vent options.
The boiler we chose, a Burnham ES2-5 (102,000 BTUs) atmospheric vent, and designed to be an energy-star rated direct replacement to the type of boiler we used to have--and many many home heating systems set-up before the 1940s and 50s have--radiated water heat.
Friday, September 16, 2011
Active and passive venting of the roof
This passive-active venting system, along with decent
bathroom and kitchen fans vented through the roof, should keep heat and
moisture levels in the walls and plenum to a minimum.
|
| This solar fan will be mounted on the roof, at the front. It has a thermal switch attached, which will activate the fan at around 75 degrees F. Notice that it is not "Made in the U.S.A." but rather, "Made in Texas." |
| This is one of the two passive vents we are installing--in the holes left behind by the roofer back in 10/2009. They are in good spots on the roof already, thus no sense in fixing them just to put two more holes in the roof... |
We are in the pink!
For a while, we have been debating on how to ventilate the roof space. I hemmed and hawed over types of insulation, whether the roof was going to get the ventilation it "needed," and how I was going to make this all work.
I realized early on in the process of thinking about insulation for the roof-rafters, I would need to provide adequate air-flow to allow the whole "unit" (insulation, roof, and ultimately the house) to breathe.
We will have a plastic (4mil sheet) "vapor barrier" installed on the ceiling rails, and the drywall placed on top of it. We have not worked out the insulation strategy for the walls yet, however.
Our research tells us that our house, a two-wythe brick (with an air-gap between the wythes) load-baring house should really not be insulated, and if the walls are insulated, there be sufficient air space to allow the walls to breathe. A typical fiberglass insulation with a vapor barrier is not the recommended way to go...
"Clearly, fiberglass batts should never be used to insulate the interior of a brick wall. (Since fiberglass batts are permeable to vapor and air, they permit interior moisture to condense on the cold bricks. That's bad.)" POSTED ON AUG 12, 2011 BY MARTIN HOLLADAY, GBA ADVISOR
So our thought process is leaning toward rock-wool (also known as stone-wool or mineral-wool), and no vapor barrier. Spray foam (closed cell) is the other choice, but we were not interested in coating the brick for a variety of reasons--With the exception of low-toxic cementitious foams, most foamed-in-place insulations contain hazardous ingredients and are toxic during application...also, the majority of commercial foams use ozone-depleting blowing agents....The EPA's concerns are discussed here.
Stay tuned...
I realized early on in the process of thinking about insulation for the roof-rafters, I would need to provide adequate air-flow to allow the whole "unit" (insulation, roof, and ultimately the house) to breathe.
| We are in the pink, so to speak. R-30 on top of the ceiling, and below the roof rafters. |
Our research tells us that our house, a two-wythe brick (with an air-gap between the wythes) load-baring house should really not be insulated, and if the walls are insulated, there be sufficient air space to allow the walls to breathe. A typical fiberglass insulation with a vapor barrier is not the recommended way to go...
"Clearly, fiberglass batts should never be used to insulate the interior of a brick wall. (Since fiberglass batts are permeable to vapor and air, they permit interior moisture to condense on the cold bricks. That's bad.)" POSTED ON AUG 12, 2011 BY MARTIN HOLLADAY, GBA ADVISOR
So our thought process is leaning toward rock-wool (also known as stone-wool or mineral-wool), and no vapor barrier. Spray foam (closed cell) is the other choice, but we were not interested in coating the brick for a variety of reasons--With the exception of low-toxic cementitious foams, most foamed-in-place insulations contain hazardous ingredients and are toxic during application...also, the majority of commercial foams use ozone-depleting blowing agents....The EPA's concerns are discussed here.
Stay tuned...
Tuesday, August 30, 2011
Hurricane Irene and other roofing matters
| small puddle. |
| leak above. |
We did discover several leaks, however. We are assessing the damage today--hopefully with the roofer who installed the new roof back in October of 2009. See older blog post for more info and judge the confidence we have on his abilities to repair his own work....
UPDATE! The roofer came by and patched the roof. A few details:
We thought we were buying a 1.5 year old roof installed properly ... we had a letter of guarantee ...
It was installed as per the previous owner's instructions. Apparently, he did not want it "heat" applied, so it was put on with adhesive only, over basic tar-paper, nothing special. OSB was substituted for the plywood called for on the invoice--my guess it was the roofer here, trying to save a couple of $$. Finally, upon examination of a section of roof cut out for the solar fan, the nails used were not galvanized nor roof nails...
There are many ways of doing something, and construction is no different than software programming in this regard. so, buyer beware...
| The roof membrane had come detached from the parapet wall. So, a patch is being applied over the parapet cap. |
| Again, in the rear of the house, same issue--the original "new" roof membrane had come detached |
| And around the hatch... |
| Finally, a couple of seams were patched. Louis, holding the torch and roof membrane, made good on his guarantee. BTW: that is a 1400+ degree Fahrenheit propane fired torch... |
Sunday, August 21, 2011
choosing tile: Tile World--Flushing, NY
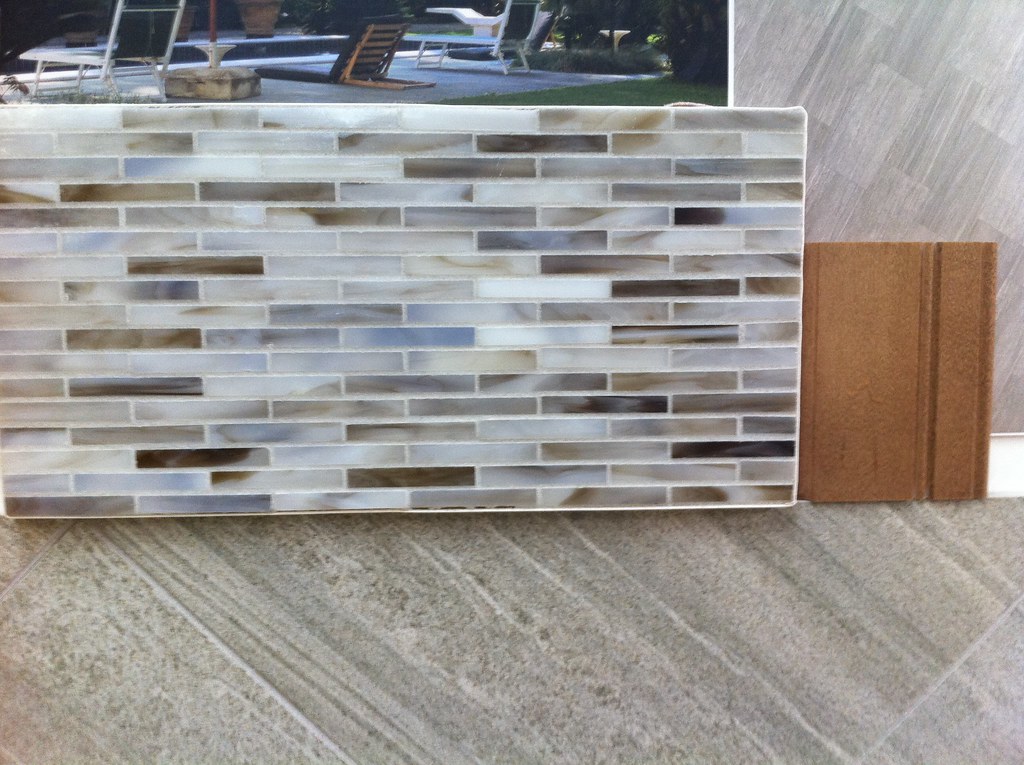
| Although the color on the image is a bit washed out, the basic matching can be seen. We chose the mosaic for the back-splash, the slightly grained composite floor tiles, against our "rye" stained maple flat-front kitchen cabinets. Tile Floor: Provenza--an Italian quartz-composite tile, with 40% post-consumer content; Back-splash: Hirsch Glass; Cabinets: KraftMaid; Counter-top: Quartz Surface by allen + roth (Sage Surfaces) Sugarbrush color |
TW has good service and a HUGE selection--two floors of tile, and downstairs, there is a kitchen cabinet showroom. KitchenWorld.
Our sales person was attentive, and patient--although, as we were undecided in many cases, she buzzed off to take care of other customers in-between her attention to us. It all worked out in the end. Tile purchased, and samples in hand for Salem, our contractor.
When we first looked at kitchen cabinetry, we sat with a TW/KW designer, and mocked up our kitchen space. The pricing was reasonable, and the available selection was pretty decent. Although ultimately we went with Lowes for the extended no-cost financing options, the folks at KitchenWorld were efficient and friendly.
Bath tiling decisions next....
Saturday, August 20, 2011
sustainability vs. practicality
In construction, there is going to be waste product. Traditionally, the industry scraps over 30% of what comes onto the job site. Up until recently, most of this waste material--packaging, broken items, left-over wire, ends of wood scrap, nails, screws, etc, etc.--wound up in a landfill.
I am happy to report, the practice of not recycling the waste or not wasting in the first place, is slowly falling out of favor, for a multitude of reasons. But, sustainability is not the first on the list.
Generally, the first priority is to maximize use, thus maximizing profit. Engineered pre-fab houses or parts of them--framing sections, for example--are great ways to maximize the material use, and minimize waste, since the pieces are assembled off-site, in a highly engineered and controlled environment. For example:
Low energy consumption processes and careful use of materials to limit waste and scrap are only part of Topsider’s commitment to sustainability and resource conservation
Now why do I mention this?
In the upcoming posts, I will be detailing the reasoning behind why we chose certain materials, our struggles with waste creation and disposal, and my feelings about the Reno-construction industry as a whole. Please stay tuned!
Thursday, August 11, 2011
Early August, and the windows go in; framing takes a back seat to the unpacking
The window installers came by last week, and did a quick, efficient, and bang-up job of placing the nine replacement Pella Impervia (a fiberglass composite window). The crew of three (contracted by WindowRama) arrived early (before 7am) and were done by 2pm. They installed new aluminum flashing and caulked the install perfectly.
| Window Information |
| Installer Crew |
| Final install |
Monday, August 1, 2011
time for a brief update, post-move
Seeing it's been over a month since we've checked-in with you all, here is a simplified pictorial version of what has been going on with the house renovation, beginning with the move:
| According to this Chinese calendar page, July 28th was deemed a good day to move--and apparently, get a hair cut. So we took this as a good sign and moved on the 28th. |
| Yes, they were our moving crew. Nice guys; move took 8.5 hours, and every inch of the truck... |
| First floor, middle room, before move... |
| After move... |
| Polly enjoys the yard in the AM, Saturday, July 30, 2011, two days after the move. Notice Verizon came in and relocated the diagonal wires--well the most offensive ones anyway... |
| Framing comes along slowly upstairs; all walls which need to be re-built are now down. |
| First we clamped off the ceiling supports... |
| Then we tacked the true 2"X3" pieces together. Many were twisted; we did our best to try and true them up. Thanks Nelson for the help! |
![]() | |
| We went with Kraftmaid (an Elkay company) cabinets from Lowes for the kitchen. We are still deciding on the color. More on the decision to use Lowes in a later post. |
| Polly meets with Jim, the Lowes kitchen specialist. For nearly THREE HOURS! |
Monday, June 27, 2011
updates, progress, and family time!
a quick update:
This weekend was a flurry of activity at the house. Polly's parents, Helen and Con had arrived from Australia on Wednesday, and we put them straight to work! The mason finished the tuck-pointing, and I began the cleanup and prep work for the next phase--the framing. Which is possible, because we were approved by the DOB! If you are interested, here is the main link to the documents on the NYC DOB site. More info than you can ever imagine...
Finally, we signed with BLUE GREEN RED, LLC to handle the construction permit, plumbing and electrical contractors, and consulting with us on the build-out and design. Salem Darrow is now our General Contractor (GC).
| Con helps out with the painting |
| Tuck-pointing complete--as complete as it is going to get... |
| Lintel repair complete |
| drywall hung in back room--now painted and complete |
Subscribe to:
Posts (Atom)